Esta es la primera entrada de mi nuevo blog. Acabo de empezar a escribir este nuevo blog. ¡Mantente al día para leer más entradas! Suscríbete a continuación para recibir notificaciones cuando publique nuevo contenido.
First let’s start with the approach into Foley and ADR taken during this semester. As stablished in our Handbook, ‘Foley and ADR are specialized post-production audio techniques which form an integral and essential part of the moving image production process. Working with talent in a studio setting is also time consuming and requires a meticulous and patient approach in order to achieve desired outcomes. Students need to gain experience in managing the technology and the talent associated with advanced post-production sound, and in working speedily in a time-limited environment. The skill set of any student wishing to work in sound for picture would be incomplete without this.’
Now let’s define both things,
Foley: ‘sound effects recorded during post-production while watching the edited picture. It its intended to blend with the rest of the soundtrack, which includes dialog, music or other recorded effects or ambient sound.’ (Contis 2019).
ADR (Automated Dialog Replacement): ‘process of re-recording audio in a more controlled and quieter setting, usually in a studio. It involves the re-recording of dialogue – after filming as a way to improve audio quality or reflect dialogue changes.’ (What is ADR in Film? 2019)
As mentioned before, both are post-production audio techniques, they’re both used in films in order to give the audience a more credible film for them to enjoy. Foley and ADR both work hand-in-hand during all post-production process, they both work as a way to ‘fix’ errors made during production, like a bad recording, an undesired sound in the background, low-impact sounds, to create a better performance, changes of dialogue, etc. The way both work is, once the film is already edited, either Foley Artists of Actors would go into the studio and watch the edited desirable scene over and over again.
For Foley Artist, they previously must have spotted the session in order for them to know which sounds they are required to recreate and when in the film they appear. Usually Foley Artist re-do the scene without any other original sound, because Foleys are more of a visual cue than an audio one. It is different for dialogues, sometimes the actors go into the studio several months after they did the original recording, so they may prefer to actually listen the original audio in order to re-do the desired part by the director. This is different from animated movies though, sometimes the animation will be created from the actual pronunciations of the actors and match their movements, instead of going the other way. It’s different from dubbing too, in here, dialogue must match the already existent animated (or non-animated) piece, which varies from animation style, it can be as vague as just open and close 2D animation, to a whole 3D Claymation movement, so every movie has its own challenges. Same goes for live action movies, the already existing movement must be matched by the dialogue replacement in the new language.
Now, onto the project. What we were required to do was: ‘extract – a short three (3) minute scene from a movie of your choice. You must then replace all of the sound in the scene with sound that you have recorded.’
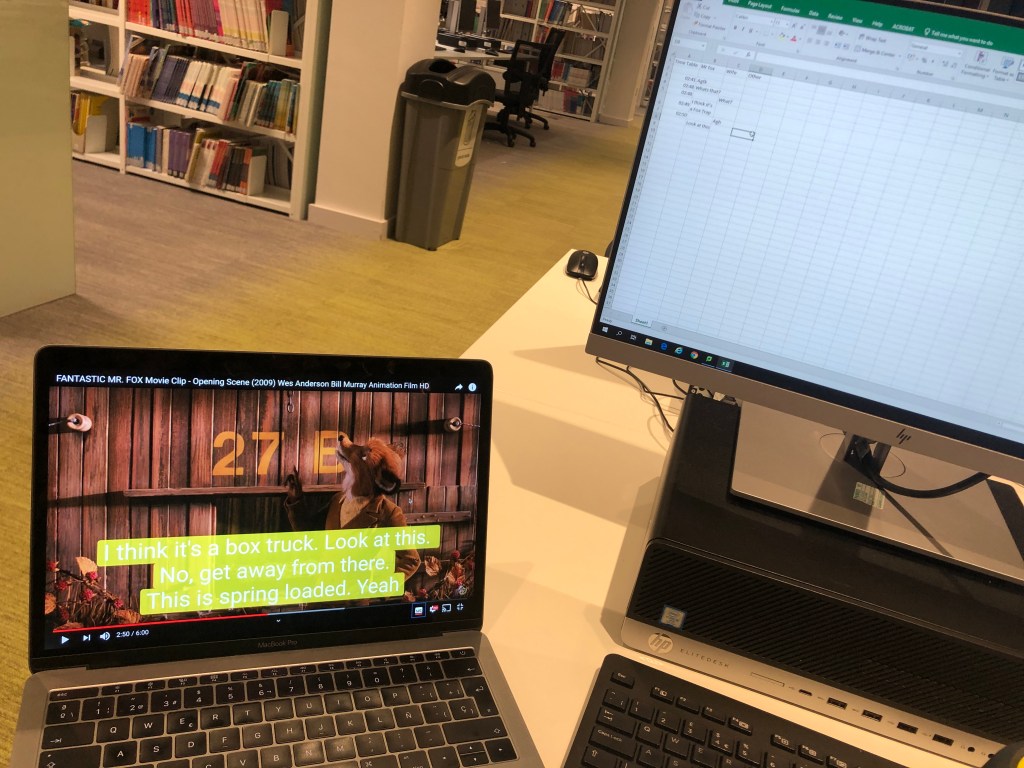
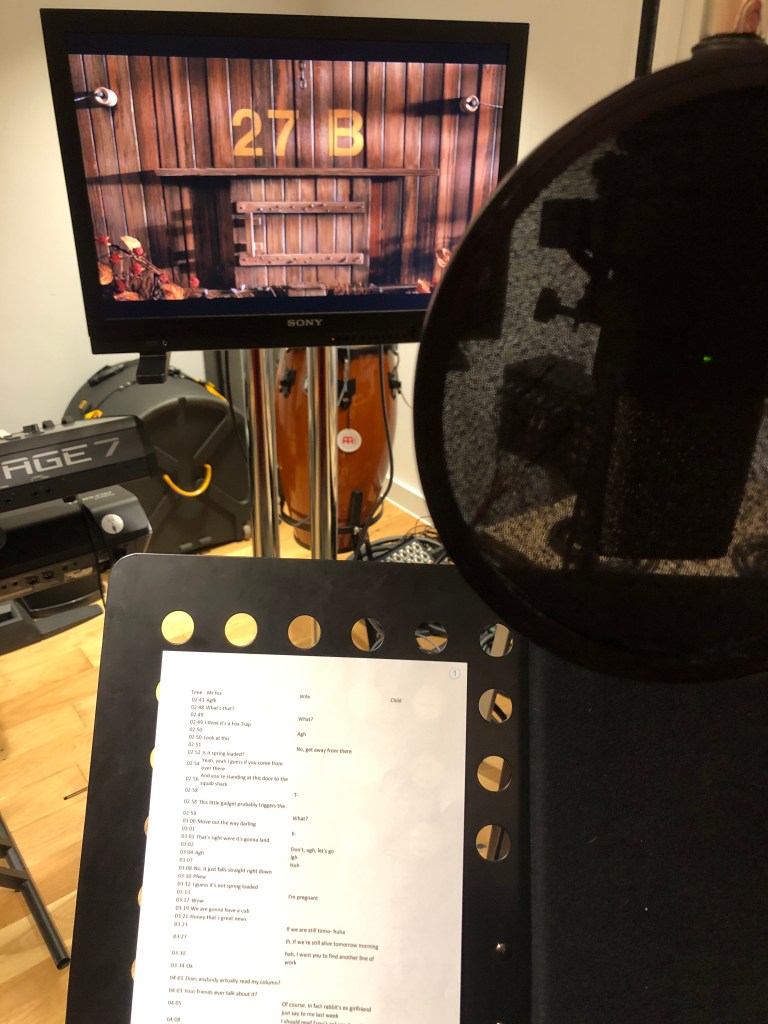
So, it’s basically re-do a whole already existing scene. Me and my partner decided to re-do a scene from the movie ‘Fantastic Mr. Fox’, it is an animated movie, using the stop motion technique. Now, the stop motion brought a whole new challenge for us, because of the attention to detail we needed when recording, since every bit of movement in the movie has a purpose behind it. Once we analyzed the whole scene, we realized we were going to have an even bigger challenge that we thought, because we had different creative approaches to what the actual movie entails. For example, the movie has a lot of scenes with background music, and most of the time is non-diegetic music (the source is not visible to the audience) and we were not going to use that to our advantage as the actual scene does. With bigger challenge we mean that many scenes that have a lot of small ‘sounding’ details were covered by the movie score, and thanks to that we had to come up with new ideas for the details we cannot even hear in the original recording.
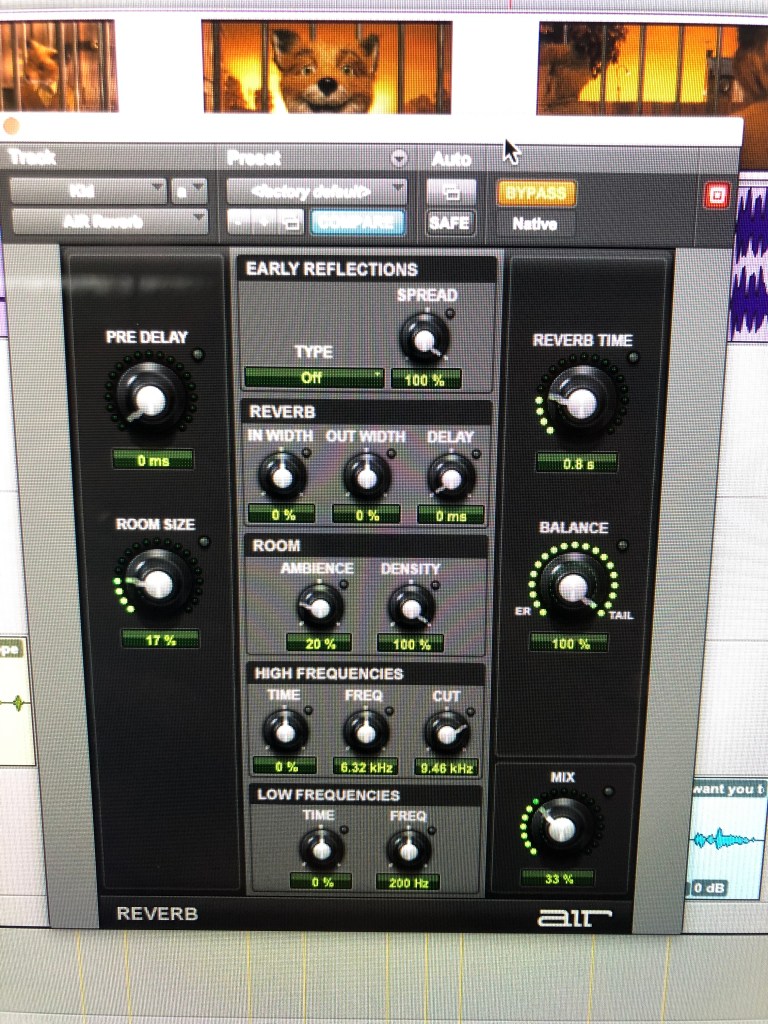
The last different creative approach we had was with the use of reverb and the sounds of steps, in the actual movie, during the kitchen scene, the whole conversation the Foxes entail have huge amount of reverb (because they are inside of a hole) but once we were editing we didn’t think that much amount was necessary for all the places inside the kitchen, because it’s not an empty room and so the sound should not bounce that much, but there is an even smaller hole inside the kitchen, which is where the kid appears, and there we agreed that there should be an exaggerated reverb compared to the outside from it. Lastly the steps (also during the kitchen scene), my partner and I agreed with the actual scene that there should be a minimum sound coming from them, because they are not even wearing shoes in any scene and they have paws, so we agreed that there should be close to no sound coming from them. The only scenes we did use sound for the footsteps was in an outside scene where they move more abruptly (in the movie they are covered with the score and we didn’t realized that those was missing until our teacher pointed it out to us) and again, in the smaller hole inside the kitchen for the kid, because sound would essentially bounce more there.
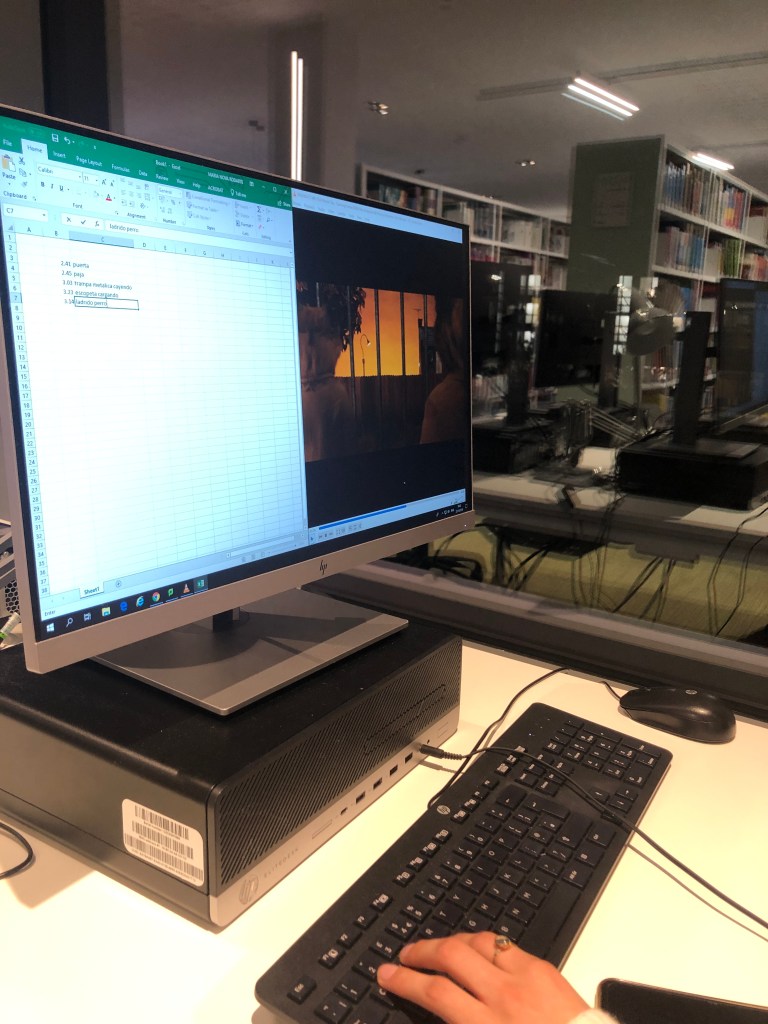
We first started with a spotting and dialogue session, where we divided our efforts. One wrote all Foley requirements and the other re-wrote all dialogues. We now knew beforehand what we needed for our sessions.
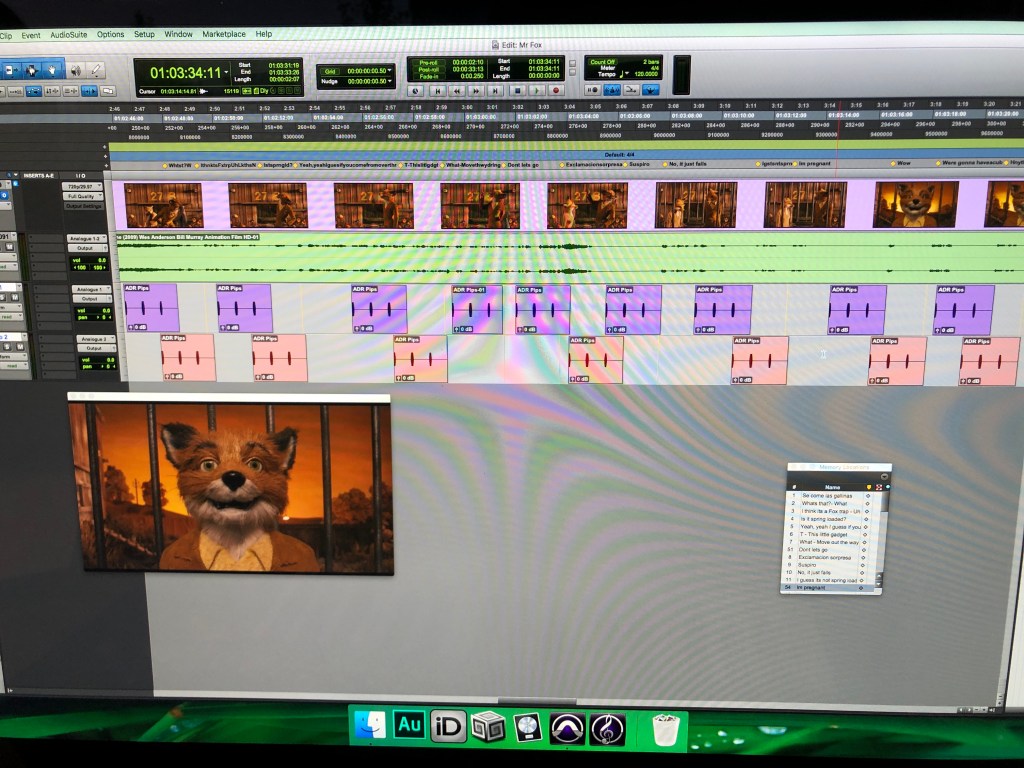
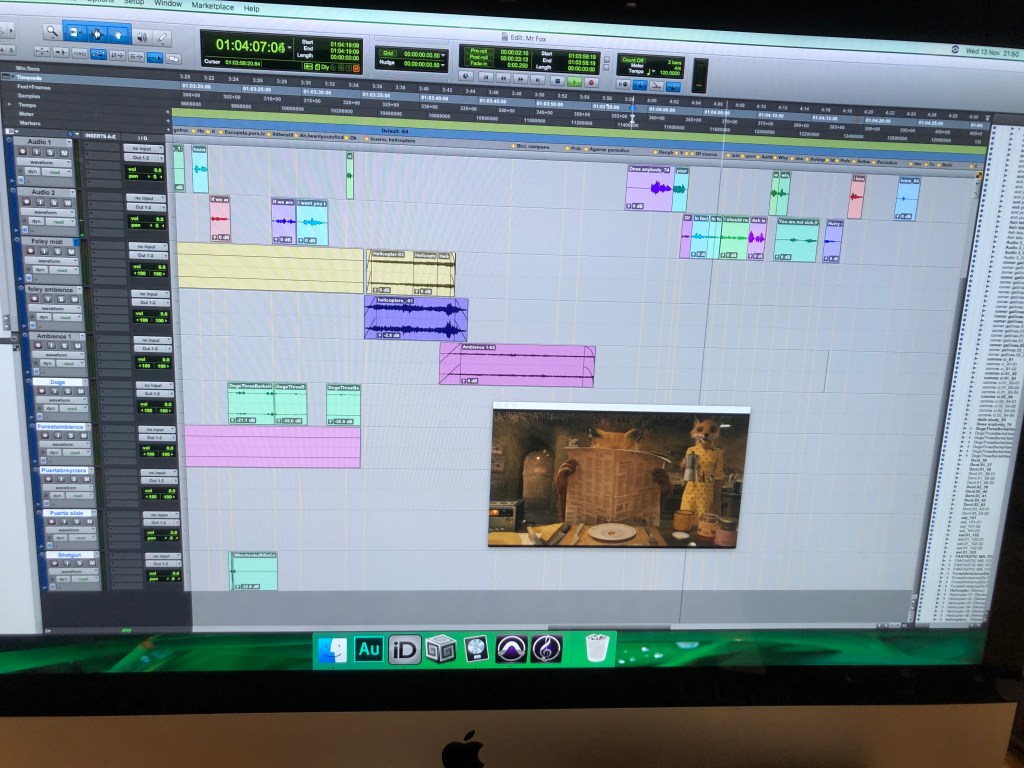
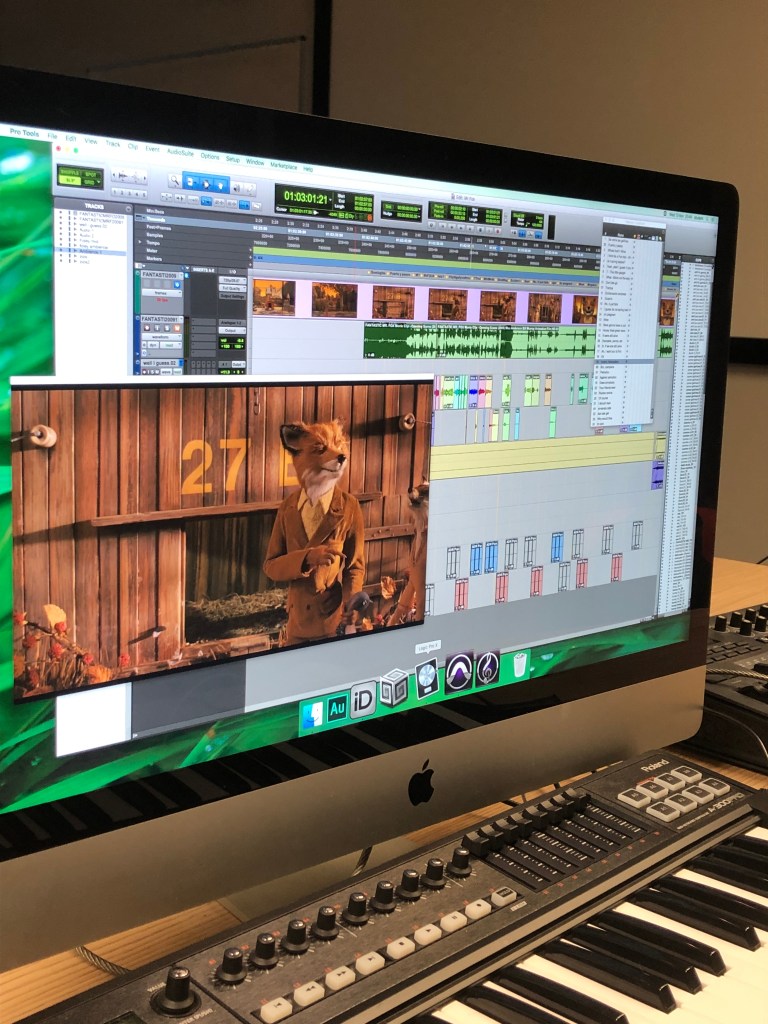
Then we moved everything to Pro Tools, we spotted the session and placed ‘bips’ for every dialogue we were doing. We also placed markers for making the recording session more agile.
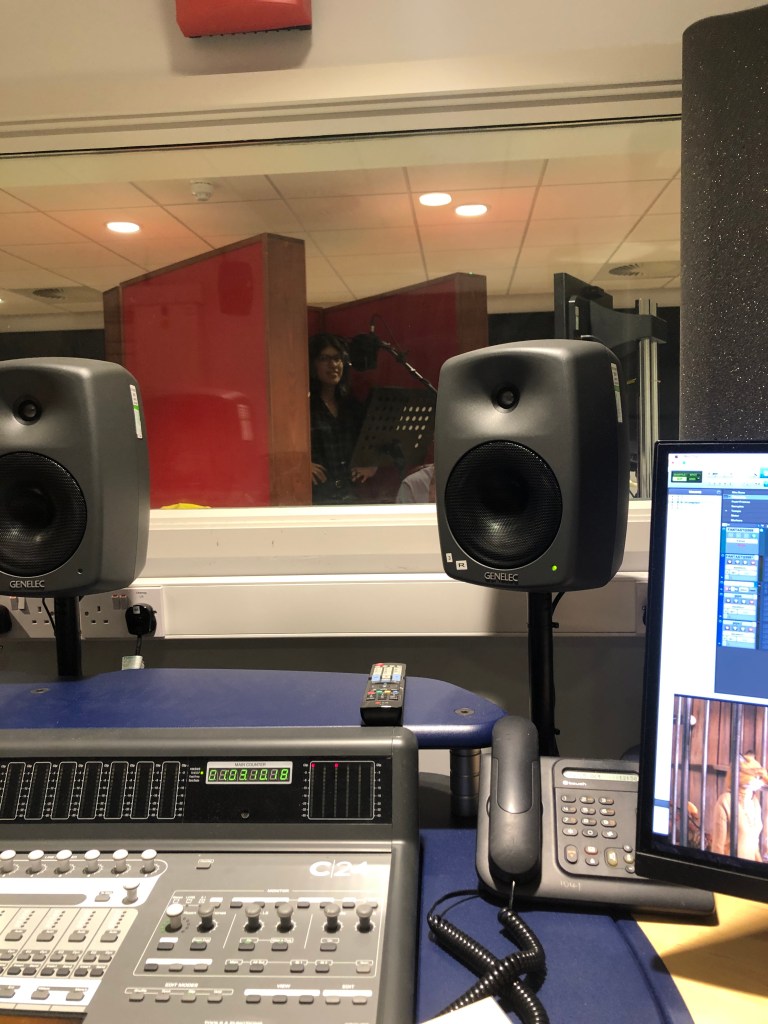
Our first session was purely recording dialogue, we started with Mr. Fox and Felicity Fox, we both decided to embrace each of us one of the characters because we wanted to work in both sides of the studio.
For the voice, we used a AKG C414 Condenser Microphone. A Condenser microphone works best for studio because, as opposed to a Dynamic microphone, it does not need an intense amount of ‘power’ for it to work best, which is the main reason Dynamic mics work better for live performances. The receiving signal of the Condenser mics is more clear and accurately, they respond to fast attacks better than the two other types of mics, and since almost every line is barely spoken loudly, we knew we had to use a Condenser.
The next sessions were outside of the studio. We edited every piece of dialogue we had in it and we paired with the original image.
Then we proceed to place markers for the Foleys we needed to record and the dialogue we were re-doing again.
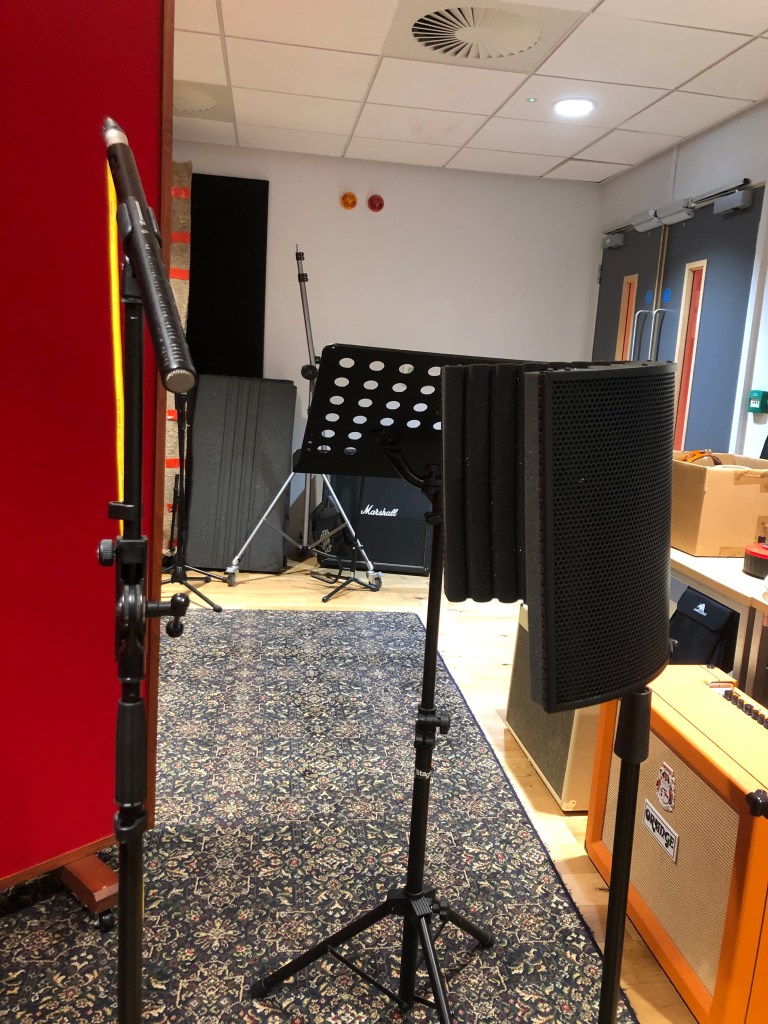
The first Foley recording session we started with the sounds we knew were ‘easy’ to recreate, since most of them are a day-to-day natural sound for us, for example a periodic paper, dishes, toothbrush effects, clothes, in others. This noises we knew we could re-create them with their actual sound from real life, and we did.
Here we used a Rode NTG2 Shotgun Microphone. The shotgun microphones use unidirectional response to achieve a higher concentration of sound. Therefore, they work so good for Foley.
We then had to figure out how to re-do the more ‘artificial’ sounds, like the shotgun, tape recorder, falling cage, sliding doors, bike movement, helicopter, barking dogs and crickets. The last three we decided to use pre-existing recordings we had lying around, but for the others we had to get ingenious.
For the re-loading shotgun, we used a pencil case:
For the bike movement, we used a tambourine:
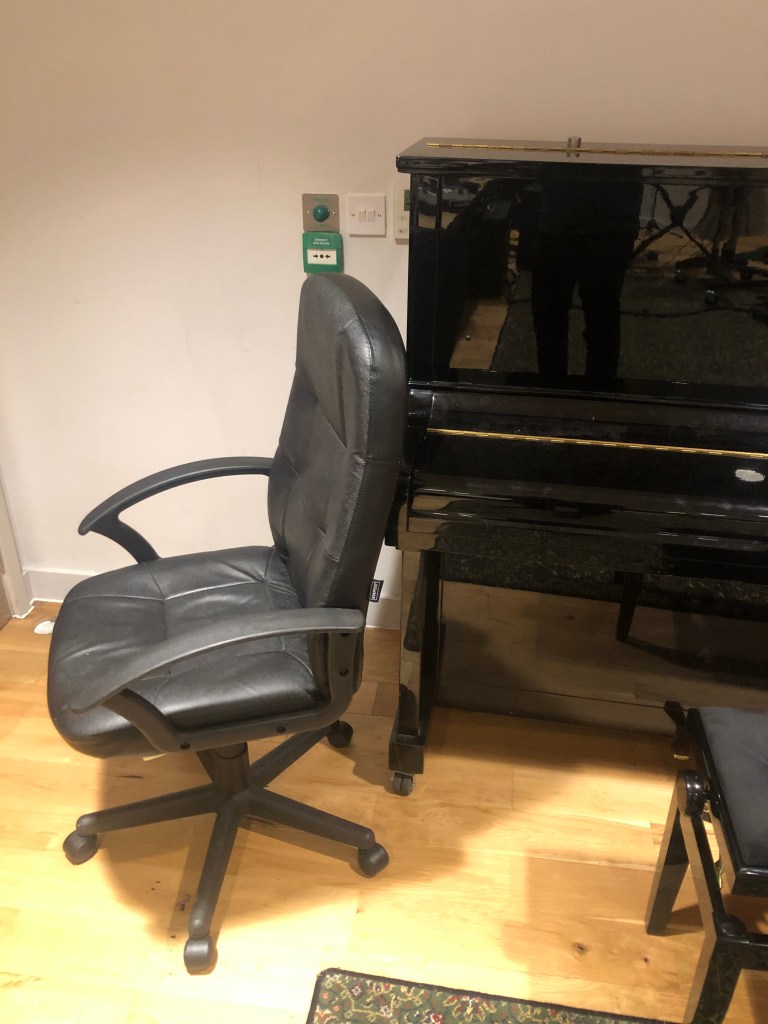
For the sliding door, we used a chair rolling in hard floor:
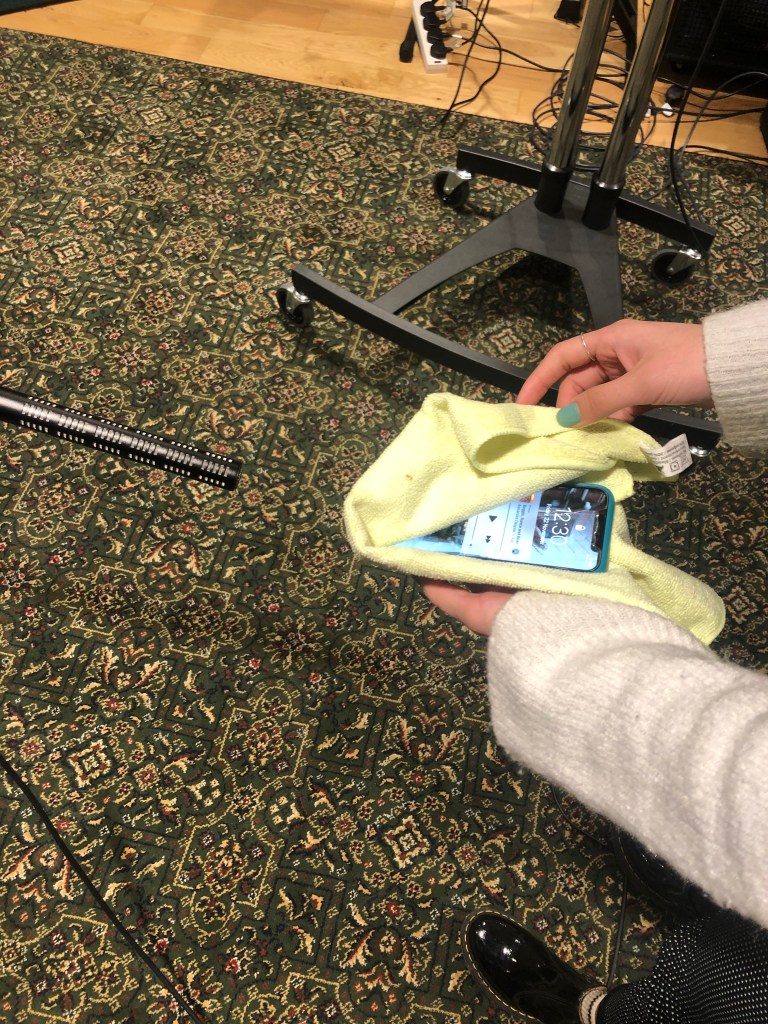
For the diegetic ‘antique’ music tape recorder, we played the original score from a telephone while covering the audio source:
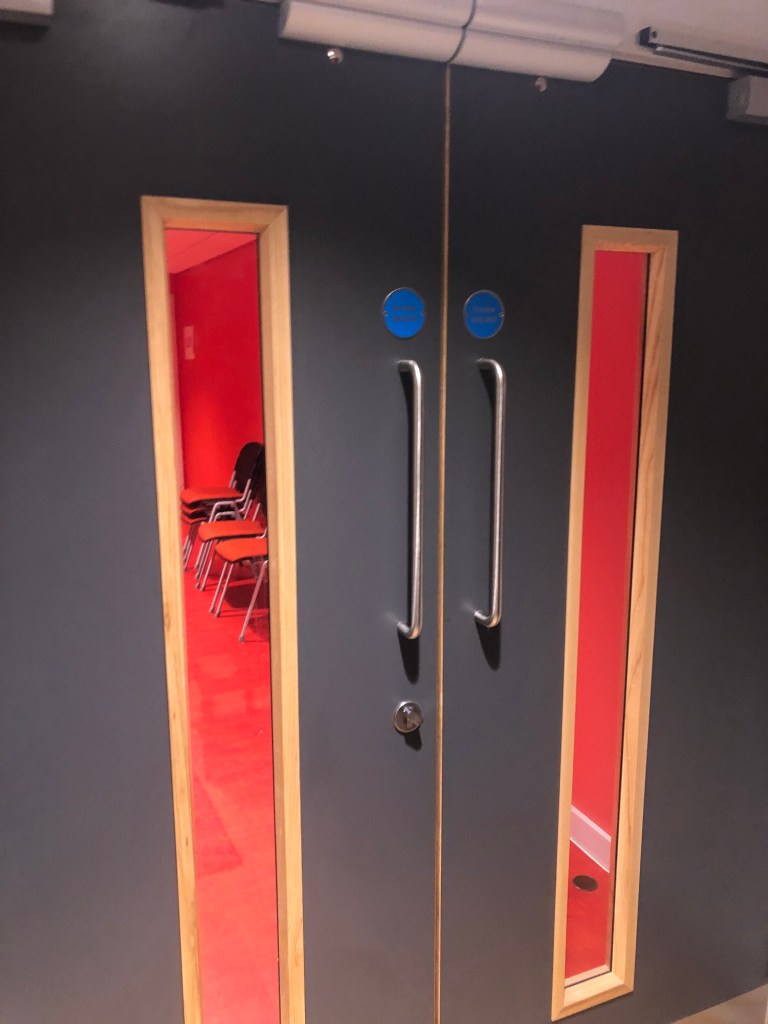
For the door, we used the ‘click’ sound this specific door made when opened:
And for the ‘Click’ from the tape recorder we used a stapler (I forgot to take a picture)
Now, for the cage we remembered we had several metal sound recordings from our first class, where we went around campus using a TASCAM and several other portable recording instruments. So, we placed them all together to create the ‘falling’ cage and pulling chain sound effects.
On our last recording session, we noticed we only were missing a child, and in big production movies they would cast a child actor, but, since we are not from here, it was almost impossible for us to get one, so, we used one of our classmates for it, the only problem here was the accent, but, every family is different, right?
Now we were down to just editing sessions, we edited every last detail, we paned most of the dialogues and sfx to give the illusion of movement following a character, we added reverb to the voices to make the illusion of a larger room or a noticeable distance between the characters.
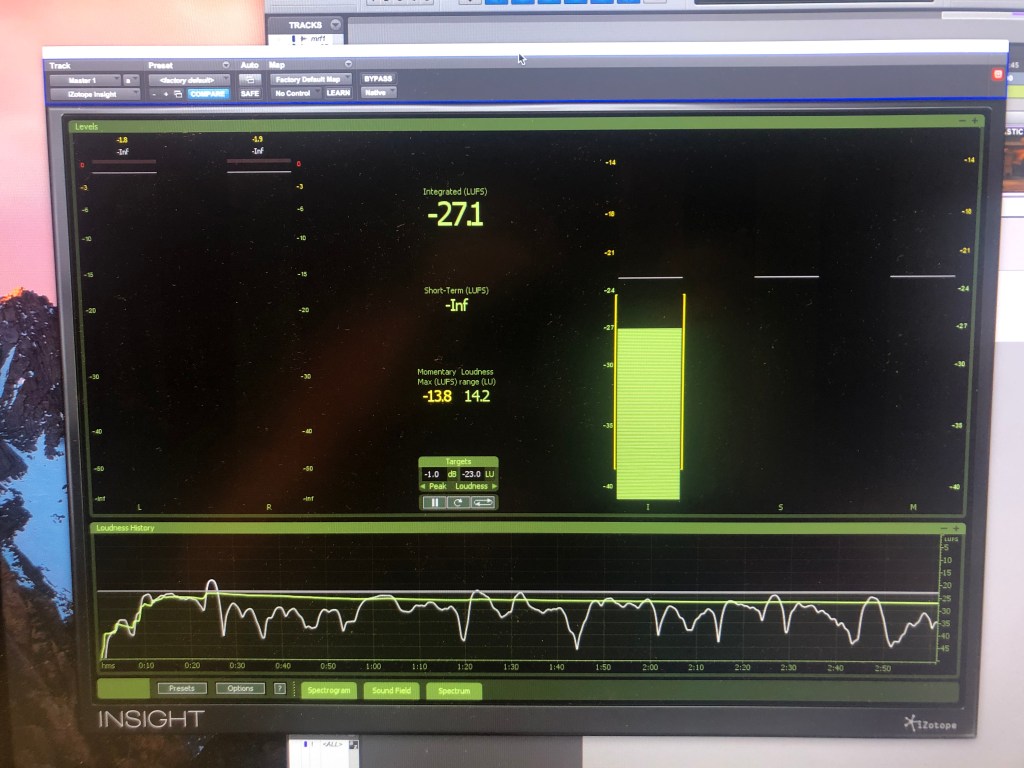
The last day we bounced our whole mix and went to the studio to use the iZotope Insight Plug-in. As said in its help guide, ‘Insight provides a full suite of audio analysis and metering tools, perfect for visualizing changes made during the mixing and mastering process, troubleshooting problematic mixes, and ensuring compliance with broadcast loudness standards.’ This plug-in allows us to monitor the loudness overall our mix, to see if we have to fix any inconvenience regarding the recommended broadcast specs (this time we did it according to the European Broadcasting Union).
We used it to check the loudness meters in our mix (‘real time displays that calculate the perceived loudness of your audio), we wanted to stay close to -23dB overall (EU regulations.)
This method, aside from being mandatory, has been found to be more accurately in the calculation of how we perceive loudness, that’s why we have to follow certain regulations (it varies in every broadcast union)
The graph at the bottom is called ‘Loudness History Graph’, this monitors loudness in real time and shows any issues in the mix. The gray area is the ‘Loudness Target’, we have to keep an eye in here, because if any issue surpasses this target by an exaggerated amount, the graph will turn red and it would mean it has a loudness violation.
Studio Practice I – Recording Acoustic Guitars and Double Bass
During this class, we learned:
Fundamentals of the studio we were going be using for the rest of the semester, some of the things were:
Workflow from the studio to the console.
Use of Phantom Power.
How to properly correct the levels.
How to record.
Importance of File Management and how we were supposed to use it for our assignment.
Basics about Pro Tools (creating new tracks, how playlists work, how to record, Mix and Edit window, etc.)
Recording Microphone technique for the Acoustic Guitar:
Rode NTR Active Ribbon, we used this for recording the body and obtain more of the low frequency notes.
Neumann KM 184 Condenser, we used this for recording the 12th fret and obtain more of the mid/high frequency notes.
Recording Microphone for Tambourine:
AKG C414 Condenser.
Date: 16th October 2019
Studio Practice II – Recording Piano
During this class, we learned:
Different stereo recording techniques, some of them were:
Mid-side.
Blumlein.
X-Y.
ORTF.
Different recording positions for recording the Piano:
4 mics on top:
2 C414 Condenser and 2 Neumann KM 184 Condenser.
1 mic under:
TLM 103 Condenser.
1 mic for ambient:
AT 4081 Ribbon.
In order to obtain the true sound of the piano, we need to pan the mics before recording.
Proximity effect comparing the Ambient sound with the rest.
Date: 23st October 2019
Studio Practice III – Recording Drums
During this class, we learned:
Recording a drum kit can be as specific as we want, we can choose to record every part of the drum or just some of it and obtain a different sound from de ‘spill’ of the drums into the microphones.
Recording Drum Techniques:
Overheads must be at an equidistance from the Snare, because this is the ‘centre’ of the kit.
For obtaining different and more tones, you can record the upper and under part of the drums.
Different positions for the Kick Drum.
In the console:
Application of high and low pass filters.
For recording we used:
Various SM 57 Dynamic, since it’s the most common mic for drums
2 Rode NTR Ribbon as overheads.
1 Shure Beta 52A for the drum kick.
Date: 6th November 2019
Studio Practice IV – Recording Electric Guitar and Bass
During this class, we learned:
How to properly microphone an amp.
Recording Microphone Techniques for amps:
4 Mics in 1 amp (Guitar):
2 SM 57 Dynamic, 1 pointing straight and 1 in a 45-degree angle.
2 KM 184 Condenser, 1 pointing straight and 1 in a 45-degree angle.
Since the SM were dynamic microphones, I learned that even though they don’t need phantom power, we could put them in the same rack, but if that wouldn’t work, another technique is to put them in a different rack than the condensers so that the impedance won’t affect the dynamic ones.
3 Mics, 2 in amp and 1 for ambience (Bass):
1 Rode NTR Ribbon, gives a darker tone.
1 SET 2 (don’t remember the actual microphone), giving a lighter tone.
1 Rode NTR Ribbon at a more distant position, it gives a neutral tone thanks to the proximity effect.
I learned the effect that the placement and position of the microphones has regarding the tone of the recording instrument.
Date: 13th November 2019
Studio Practice V – Recording Vocals and Brass
During this class, we learned:
Proper recording techniques for vocals.
Use of 2 microphones for recording the same voice, 1 on top of each other:
Sontronics ARIA Condenser, this mic gave a much ‘warmer’ tone for the voice, making it more natural.
Neumann U87 Condenser, this mic gave the vocals a more ‘digital’ tone.
Date: 14th November 2019
Recording Day – Recording Assessment
For this recording I wanted to incorporate things I learned throughout the whole semester:
Acoustic Guitar Class
Rode NTR Active Ribbon, recording the body.
Neumann KM 184 Condenser, recording the 12th fret.
Tambourine:
AKG C414 Condenser.
Piano Class
Stereo recording techniques
Mid-side.
Different recording positions for the Piano:
1 mic under:
TLM 103 Condenser.
1 mic for ambient:
AT 4081 Ribbon.
Drums Class
Recording Drum Techniques:
Overheads must be at an equidistance from the Snare, because this is the ‘centre of the kit’.
Electric Guitar and Bass
4 Mics in 1 amp (Guitar):
2 KM 184, 1 pointing straight and 1 in a 45-degree angle.
Vocals
Use of 2 microphones for recording the same voice, 1 on top of each other:
Neumann U87 Condenser, this mic gave the vocals a more ‘digital’ tone.
Project Explanation
I used 6 mics, when I first thought of this was because I’ve previously worked with live orchestral performances and I had already learned about a technique that Tomlinson Holman in ‘Surround Sound Up and Running’ explains as ‘Pan Pot Stereo’ and another one as ‘Spot Miking’:
Pan Pot Stereo consists on placing several microphones throughout the orchestra, in proximity to the instruments in order to obtain an isolated sound from each of them.
Spot Miking consists on, as the previous one, to place several microphones across the orchestra, with the difference that in this one, there would be an emphasis in one instrument (or group of instruments, mostly the soloist) above the rest.
What I wanted to do here was to treat my guitar as an ‘orchestra’, recording several parts of it, from several angles, with several different types of microphones, searching to obtain an isolating sound from each ‘section’.
I forgot to take photos on the recording day, but this is what I did:
Acoustic Guitar:
I used 4 condensers and 2 ribbon microphones for recording the acoustic guitar. I chose the condenser mics because the dynamics are mostly used in live performances, and when used in studio is for either powerful vocals or big sounding instruments, like drums or electric guitars, because they need great amounts of energy for them to work properly, making them less responsive (also because of the weight of its mechanism) than either the ribbon or the condenser mics.
My song was going to be a fingerstyle acoustic song, so I needed the receiving signal to be more clear and accurately, and for that, the condenser mics work better, they respond to fast attacks better than the other two types of mics.
Also, I wanted the bass frequencies to feel warmer and precisely, and high frequencies to have more tone, which is why I used the proximity effect in both Ribbon mics, placing one very close to the body of the guitar and one the furthest from it.
I wanted it to be divided into 3 sections:
Low frequencies:
1 Rode NTR Active Ribbon, in front of the body:
Like I said previously, I wanted it to capture the low frequency notes more than the mid and high ones, which is why I used it at the bottom part of the body.
Here I applied the proximity effect, which Bill Gibson in ‘The S.M.A.R.T guide to Mixers, signal processors, microphones, and more’ describes in a simple way:
When a sound source is closer to the microphone, the low frequencies will increase in range, taking more presence than if we were to put it further away (also, the closer it is, the more it cancels higher frequencies).
I also placed it in a low position, because as physics states, low frequencies travel greater distances at low height.
1 TLM 103 Condenser behind the body:
We used it to record the low frequencies of the piano, placing it under it. The logic I used here was that, if it could capture low frequency notes from the piano, it could capture the ones coming from behind the guitar. When I finished recording, I noticed that this mic was bringing a lot of noise, so I decided not to include it. Later, I realized that the cable was damaged and that’s why the mic didn’t record properly.
Mid frequencies:
1 AKG C414 Condenser
1 KM 184 Condenser
Here I placed both on the 12th fret of the guitar, I wanted to capture the mid frequency tone from two different microphone directionalities.
At first, I was going to use the ‘mid-side’ recording technique we learned on the piano class, where we place a cardioid mic pointing directly at a source, on top of a figure of eight pattern pointing sideways. The problem with this was that, according to Holman, the front and back halves of a microphone have opposite polarity voltage (one positive and the other negative), he explains that:
The sum of the cardioid pointing directly, and the figure of eight being sideways, results on a left-forward facing sound.
Subtracting them results in a right-forward sound.
So, in order to avoid this, in the mix session we have to duplicate the recording and make a phase inversion, making the right halve be in phase with the left one.
When recording, I realized that I was not aiming for that difference in sound, I just wanted to hear the difference from a unidirectional and a figure of eight pointing at the same spot, so I just placed them both pointing directly.
High frequencies:
1 KM 184 Condenser
Here I wanted to record the nut of the guitar, where the fretboard starts, because there is where the less low frequency notes the guitar produces.
I thought of using the ORTF technique, which consists in pointing two cardioid mics at a 110-degree angle, but this technique, as explain by Holman, is mostly used to obtain a surround sound. Since I was not looking for a surround sound, I used the previously mic pointing directly at the 12th fret and the other at a 45-degree angle, this would still give me a difference in the sound, obtaining an even ‘lighter’ response than if I were just pointing it directly to the nut (I learned this technique at the ‘Electric Guitar and Bass Class’).
1 AT 4081 Ribbon
We used this mic during the ‘Piano Class’ to record ambience and a ‘lighter’ and more distant sound from the piano.
In the guitar, I didn’t only want the ambience sound, I also placed it higher in order to capture most of the high frequency notes, since those travels through air in the opposite way low frequency notes do. When listening back to this recording, this mic captured more ambience sound than I was expecting, so I decided not to use this one either.
Vocals
For vocals at first I thought of using dynamic microphones because I know that in studio, the dynamics one do work for this thanks to the amplification of the signal they do, but like I mentioned earlier, it’s for powerful vocals or big sounding instruments, because they need great amounts of energy for them to work properly, and since my song wasn´t like that, I decided to go with the condenser.
I used 2 condenser microphones, using the technique of 2 at the same time, one on top of each other:
AKG C414 Condenser (top)
Neumann U87 Condenser (bottom)
Since previously stated, the Neumann did give a more digital sound, but it also was darker than the C414 because it was in a lower position, so I decided to go with the AKG C414.
Tambourine
Here I was just going to record the C414 because it was the one we used for recording it the first class thanks to its quickly transient response, but I wanted to try something different:
AT 4081 Ribbon
I decided to use the AT 4081 Ribbon mic, because since it’s a ribbon microphone, I knew that if I placed it a little farther away from the tambourine, kind of what we did with the overheads in the ‘Drums Class’, the high frequency notes it would capture would be more clean and natural, ‘smoothing’ the signal.
References
Holman, T. (2008): Surround sound up and running (Chapter 3). UK: Focal Press.
Gibson, B. (2005): The S.M.A.R.T guide to Mixers, signal processors, microphones, and more (Chapters 1 and 5). Canada: Artist Pro Publishing.
*I did not quote what the authors wrote when I previously mentioned them because I didn’t write their explanation, instead I wrote what I understood from the reading I did.
Studio Practice I – Recording Acoustic Guitars and
Double Bass
During this class, I learned:
Fundamentals of the studio we were going be using for the rest of the semester, some of the things were:
Workflow from the studio to the console.
Use of Phantom Power.
How to properly correct the levels.
How to record.
Importance of File Management and how we were supposed to use it for our assignment.
Basics about Pro Tools (creating new tracks, how playlists work, how to record, Mix and Edit window, etc.)
Recording Microphone technique for the Acoustic Guitar, we used two Microphones this class:
Rode NTR Active Ribbon, we used this for recording the body and obtain more of the low frequency notes.
Neumann KM 184 Condenser, we used this for recording the 12th fret and obtain more of the mid/high frequency notes.
Recording Microphone for Tambourine:
AKG C414 Condenser.
Date: 16th October
2019
Studio Practice II – Recording Piano
During this class, I learned:
Different stereo recording techniques, some of them were:
Mid-side.
Blumlein.
X-Y.
ORTF.
Different recording positions for recording the Piano:
4 mics on top:
2 C414 Condenser and 2 Neumann KM 184 Condenser (not 100% sure).
1 mic under:
TLM 103 Condenser.
1 mic for ambient:
AT 4081 Ribbon.
In order to obtain the true sound of the piano, we need to pan the mics before recording.
Proximity effect comparing the Ambient sound with the rest.
Date: 23st October
2019
Studio Practice III – Recording Drums
During this class, I learned:
Recording a drum kit can be as specific as we want, we can choose to record every part of the drum or just some of it and obtain a different sound from de ‘spill’ of the drums into the microphones.
Recording Drum Techniques:
Overheads must be at an equidistance from the Snare, because this is the ‘centre of the kit’.
For obtaining different and more tones, you can record the upper and under part of the drums.
Different positions for the Kick Drum.
In the console:
Application of high and low pass filters.
For recording we used:
Various SM 57 Dynamic, since it’s the most common mic for drums.
2 Rode NTR Ribbon as overheads (not 100% sure).
1 Shure Beta 52A for the drum kick (not 100% sure).
Date: 6th November
2019
Studio Practice IV – Recording Electric Guitar and Bass
During this class, I learned:
How to properly microphone an amp.
Recording Microphone Techniques for amps:
4 Mics in 1 amp (Guitar):
2 SM 57 Dynamic, 1 pointing straight and 1 in a 45-degree angle.
2 KM 184 Condenser, 1 pointing straight and 1 in a 45-degree angle.
Since the SM were Dynamic Microphones, I learned that most even though dynamics microphones don’t need Phantom Power, we could put them in the same rack, but if that wouldn’t work, another technique is to put them in a different rack than the condensers so that the impedance won’t affect the dynamic ones.
3 Mics, 2 in amp and 1 for ambience (Bass):
1 Rode NTR Ribbon, gives a darker tone.
1 SET 2 (don’t remember the actual microphone), giving a lighter tone.
1 Rode NTR Ribbon at a more distant position, it gives a neutral tone thanks to the proximity effect.
I learned the effect that the placement and position of the microphones has regarding the tone of the recording instrument.
Date: 13th November
2019
Studio Practice V – Recording Vocals and Brass
During this class, I learned:
Proper recording techniques for vocals.
Use of
2 microphones for recording the same voice, 1 on top of
each other:
Sontronics
ARIA Condenser, this mic gave a much ‘warmer’ tone for the voice, making it
more natural.
Neumann U87 Condenser,
this mic gave the vocals a more ‘digital’ tone.
Date: 14th November
2019
Recording Day – Recording Assessment
For this recording I wanted to incorporate things I learned throughout the whole semester:
Acoustic Guitar Class
Rode NTR Active Ribbon, recording the body.
Neumann KM 184 Condenser, recording the 12th fret.
Tambourine:
AKG C414 Condenser.
Piano Class
Stereo recording techniques
Mid-side.
Different recording positions for the Piano:
1 mic under:
TLM 103 Condenser.
1 mic for ambient:
AT 4081 Ribbon.
Drums Class
Recording Drum Techniques:
Overheads must be at an equidistance from the Snare, because this is the ‘centre of the kit’.
Electric Guitar and Bass
4 Mics in 1 amp (Guitar):
2 SM 57, 1 pointing straight and 1 in a 45-degree angle.
2 KM 184, 1 pointing straight and 1 in a 45-degree angle.
Vocals
Use of 2 microphones for recording the same voice, 1 on top of each other:
Neumann U87 Condenser, this mic gave the vocals a more ‘digital’ tone.
Project
Explanation
I used 6 mics, when I first thought of this was because I’ve previously worked
with live orchestral performances, and I had already learned about a technique
that Tomlinson Holman in ‘Surround Sound Up and Running’ explains as ‘Pan Pot
Stereo’ and another one as ‘Spot Miking’:
Pan Pot Stereo consists
on placing several microphones throughout the orchestra, in proximity to the instruments
in order to obtain an isolated sound from each of them.
Spot Miking consists
on, as the previous one, to place several microphones across the orchestra,
with the difference that in this one, there would be an emphasis in one
instrument (or group of instruments, mostly the soloist) above the rest.
What I wanted to do here was to treat my guitar as an ‘orchestra’,
recording several parts of it, from several angles, with several different
types of microphones, searching to obtain an isolating sound from each ‘section’.
I forgot to take photos on the recording day, but this is what I did:
Acoustic Guitar:
I used 4 condensers and
2 ribbon microphones for recording the acoustic guitar. I chose the condenser
mics because the dynamics are mostly used in live performances, and when used
in studio is for either powerful vocals or big sounding instruments, like drums
or electric guitars, because they need great amounts of energy for them to work
properly, making them less responsive (also because of the weight of its mechanism)
than either the ribbon or the condenser mics.
My song was going to
be a fingerstyle acoustic song, so I needed the receiving signal to be more
clear and accurately, and for that, the condenser mics work better, they
respond to fast attacks better than the other two types of mics.
Also, I wanted the
bass frequencies to feel warmer and precisely, and high frequencies to have
more tone, which is why I used the proximity effect in both Ribbon mics,
placing one very close to the body of the guitar and one the furthest from it.
I wanted it to be
divided into 3 sections:
Low frequencies:
1 Rode NTR Active Ribbon, in front of the body:
Like I said previously, I wanted it to capture the low frequency notes
more than the mid and high ones, which is why I used it at the bottom part of
the body.
Here I applied the proximity effect, which Bill Gibson in ‘The S.M.A.R.T
guide to Mixers, signal processors, microphones, and more’ describes in a
simple way:
When a sound source
is closer to the microphone, the low frequencies will increase in range, taking
more presence than if we were to put it further away (also, the closer it is,
the more it cancels higher frequencies).
I also placed it in a low position, because as physics states, low frequencies
travel greater distances at low height.
1 TLM 103 Condenser behind the body:
We used it to record the low frequencies of the piano, placing it under
it. The logic I used here was that, if it could capture low frequency notes
from the piano, it could capture the ones coming from behind the guitar. When I
finished recording, I noticed that this mic was bringing a lot of noise, so I
decided not to include it. Later, I realized that the cable was damaged and
that’s why the mic didn’t record properly.
Mid frequencies:
1
AKG C414 Condenser
1 KM 184 Condenser
Here I placed both on the 12th fret of the guitar, I wanted
to capture the mid frequency tone from two different perspectives.
At first, I was going to use the ‘mid-side’ recording technique we
learned on the piano class, where we place a cardioid mic pointing directly at
a source, on top of a figure of eight pattern pointing sideways. The problem
with this was that, according to Holman, the front and back halves of a
microphone have opposite polarity voltage (one positive and the other
negative), he explains that:
The sum of the cardioid pointing
directly, and the Figure-8 being sideways, results on a left-forward facing
sound.
Subtracting them results in a right-forward sound.
So, in order to avoid this, in the mix session we have to duplicate the
recording and make a phase inversion, making the right halve be in phase with
the left one.
When recording, I realized that I was not aiming for that difference in
sound, I just wanted to hear the difference from a unidirectional and a figure
of eight pointing at the same spot, so I just placed them both pointing
directly.
High frequencies:
1 KM 184 Condenser
Here I wanted to record the nut of the guitar, where the fretboard
starts, because there is where the less low frequency notes the guitar
produces.
I thought of using the ORTF technique, which consists in pointing two
cardioid mics at a 110-degree angle, but this technique, as explain by Holman,
is mostly used to obtain a surround sound. Since I was not looking for a
surround sound, I used the previously mic pointing directly at the 12th
fret and the other at a 45-degree angle, this would still give me a difference
in the sound, obtaining an even ‘lighter’ response than if I were just pointing
it directly to the nut (I learned this technique at the ‘Electric Guitar and
Bass Class’).
1 AT 4081 Ribbon
We used this mic during the ‘Piano Class’ to record ambience and a
‘lighter’ and more distant sound from the piano.
In the guitar, I didn’t only want the ambience sound, I also placed it higher
in order to capture most of the high frequency notes, since those travels through
air in the opposite way low frequency notes do. When listening back to this
recording, this mic captured more ambience sound than I was expecting, so I
decided not to use this one either.
Vocals
For vocals at first I
thought of using dynamic microphones because I know that in studio, the
dynamics one do work for this thanks to the amplification of the signal they
do, but like I mentioned earlier, it’s for powerful
vocals or big sounding instruments, because they need great amounts of energy
for them to work properly, and since my song
wasn´t like that, I decided to go with the condenser.
I used 2 condenser
microphones, using the technique of 2 at the same time, one on top of each
other (I didn’t want to mess with the external power source and risk doing
something wrong so I didn´t use the ARIA.):
AKG C414 Condenser (top)
Neumann U87 Condenser
(bottom)
Since previously stated, the Neumann did give a more digital sound, but
it also was darker than the C414 because it was in a lower position, so I
decided to go with the AKG C414.
Tambourine
Here I was just going
to record the C414 because it was the one we used for recording it the first
class thanks to its quickly transient response, but I wanted to try something
different:
AT 4081 Ribbon
I decided to use the AT 4081 Ribbon mic, because since it’s a ribbon
microphone, I knew that if I placed it a little farther away from the
tambourine, kind of what we did with the overheads in the ‘Drums Class’, the
high frequency notes it would capture would be more clean and natural,
‘smoothing’ the signal.
References
Holman, T. (2008): Surround sound
up and running (Chapter 3). UK: Focal Press.
Gibson, B. (2005): The S.M.A.R.T
guide to Mixers, signal processors, microphones, and more (Chapters 1 and 5). Canada:
Artist Pro Publishing.
*I did not quote what the authors
wrote when I previously mentioned them because I didn’t write their
explanation, instead I wrote what I understood from the reading I did.
Esto es una entrada de muestra, originalmente publicada como parte de Blogging University. Regístrate en uno de nuestros diez programas y empieza tu blog con buen pie.
Hoy vas a publicar una entrada. No te preocupes por el aspecto de tu blog. Tampoco te preocupes si todavía no le has puesto un nombre o si todo esto te agobia un poco. Tan solo haz clic en el botón «Nueva entrada» y explícanos por qué estás aquí.
¿Por qué es necesario?
Porque proporciona contexto a los nuevos lectores. ¿A qué te dedicas? ¿Por qué deberían leer tu blog?
Porque te ayudará a concentrarte en tus propias ideas sobre tu blog y en lo que quieres hacer con él.
La entrada puede ser corta o larga, una introducción de tu vida o una declaración de los objetivos del blog, un manifiesto de cara al futuro o una breve descripción del tipo de cosas que pretendes publicar.
Te ofrecemos algunos consejos útiles para ayudarte a empezar:
¿Por qué publicas tus entradas en lugar de escribir en un diario personal?
¿Sobre qué temas crees que escribirás?
¿Con quién te gustaría conectar a través de tu blog?
Si tu blog resulta ser un éxito a lo largo del próximo año, ¿qué objetivo te gustaría lograr?
No tienes por qué atarte a las decisiones que tomes ahora. Lo bueno de los blogs es que evolucionan constantemente a medida que aprendemos nuevas cosas, crecemos e interactuamos los unos con los otros. Pero está bien saber dónde y por qué empezaste, y plasmar tus objetivos puede darte más ideas para las entradas que quieres publicar.
¿No sabes por dónde empezar? Tan solo escribe lo primero que se te ocurra. Anne Lamott, autora de un libro sobre cómo escribir que nos encanta, afirma que debemos permitirnos escribir un «primer borrador de mierda». Anne está en lo cierto: tan solo tienes que empezar a escribir, y ya te encargarás de editarlo más tarde.
Cuando todo esté listo para publicarse, asigna entre tres y cinco etiquetas a la entrada que describan el centro de atención de tu blog: escritura, fotografía, ficción, educación, comida, coches, películas, deportes… ¡Lo que sea! Estas etiquetas ayudarán a los usuarios interesados en tus temas a encontrarte en el Lector. Una de las etiquetas debe ser «zerotohero», para que los nuevos blogueros también puedan encontrarte.